Zooming Through Life (and a livestream!)
This past Tuesday was a relatively normal day for me, meaning I engaged in somewhere on the order of 5 to 8 Zoom calls of various lengths. I’m using “Zoom calls” loosely – some of those calls were on Zoom, some were on Microsoft Teams, and there may even have been one on Google. That evening I had a live stream for the Apocalyptic Open Mic.
One of the things that has been particularly challenging during these livestream-only days is that technology platforms are both fickle and also not all that easy to monitor during one’s own livestream performance. When you’re performing in front of a crowd, you know pretty quickly if a cord is broken or if the fuse on the PA system has tripped. You don’t have that same level of feedback on a livestream as – by definition – the audience is experiencing the show somewhere else.
On Tuesday, my performance went fairly smoothly. Unfortunately, the broadcast did not. In the course of a webinar I had participated in earlier in the day, I adjusted my microphone setting; then later, during my performance, the microphone level did exactly what I had set it to do. Zoom is not an intelligent program: it interpreted the dynamics of my performance as being either too loud or too soft and kept adjusting the microphone volume accordingly. As a result, a significant portion of the audio from the performance is too low to be heard.
So, first let me show you what it’s supposed to look/sound like, and then I’ll step you through the checklist:
We all have mental checklists for when we set up for live performance. So, here is my checklist for setting up for a livestream. I offer this to you both in hopes of sharing best practices, and also to remind myself that this is the list that I need to go through myself each and every time!
Days leading to the performance
Set up the set list. This is usually done by thinking through songs I haven’t played in a while and want to add back in. I may also have an idea for a cover song that I would like to include. Usually I try and do that two or three shows out so I get a chance to learn or relearn the song.
Morning of the performance
Pick out the songs that I know the least well, or are the most either technically or vocally challenging. Play them at least three times through in any particular setting (often between meetings when there’s not enough time to do anything else).
Approximately one hour before going live.
This is when we transform a normal living space into a broadcast studio. The first things to come out are the mixer, microphone and mic stand, camera stand, and the lighting rig. All of these are of course quite modest, but they are things that were not, strictly speaking, part of the equipment closet before March 2020.
I’m using an old Dell laptop as my broadcast computer. The reasons for this are twofold: 1) It was available. 2) It has a CAT 5 jack on it that allows me to hardwire the computer to the router. I’ve found that no matter how good the WiFi is, it is not robust nor reliable enough for livestreaming, especially for music.

The microphone I’m using is an AudioTechnica AT 2020. It’s a condenser, which allows for better capture of sound around the room and allows me to move around a little bit. It is the third or fourth microphone that I have tried, and seems to be working pretty well. The guitar goes straight into the board thanks very much to a piezo contact pickup I have stuck just past the bridge.

Both of these signals go into an Alesis MultiMix 4 mixer, a relatively recent addition to my rig. Before this, I used a Studio One direct box, and before that I simply went directly into the computer via the same condenser mic I used for Zoom and Teams calls.
My current webcam is probably also the next thing to be replaced. As a standard video-conferencing camera, it is designed to be optimal for broadcasting groups of people from a conference room. As a result it has a slightly fisheye quality which is not exactly perfect for livestreams. Nonetheless, that’s what I use for now.
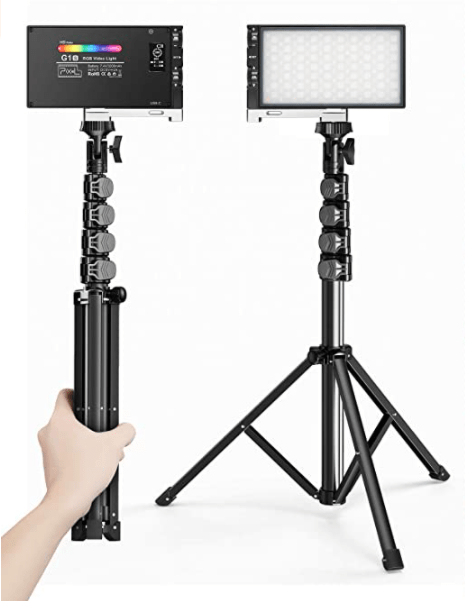
The lighting rig is another fairly recent addition. The lighting that we typically use in our living spaces tends to be tinted a little warm, or slightly orange or yellow. While the ambiance this creates is certainly soothing in person, human subjects viewed through a computer screen in this light tend to look as though they have a slight liver problem. So, about a month ago I invested in a Pixel G1s with a variable LED color spectrum, and that has helped considerably.
Once the hardware is set up, then the magic of getting Zoom and Facebook Live to talk to each other nicely begins.
First, start a new meeting in Zoom and ensure that everything is in frame. Next comes the part where I have been known to miss a step or two: audio settings.
So….. It should be recognized that neither Facebook Live nor Zoom was ever designed for how we are using them. They were designed basically for video chats and conference calls. They were not intended to be high fidelity broadcast systems for music. However, they can be tricked into doing things that kind-of-sort-of work.

Step 1: Make sure you are using the correct audio input in Zoom. Look for the mute button on the bottom left part of the screen and you’ll notice there is a caret just to its right. Click this, and then select a microphone from the list provided. If you, like me, are using a USB bus, make sure you select that one. It is important that you check this every time if you use Zoom for other purposes, as it is likely to search around and find other audio sources that you were not expecting.

Step 2: Configure and test the audio input to ensure audio levels and balance are correct. In that same menu next to the mute button is a selection for “Audio Settings.” Click this and look for “Music and Professional Audio” in the Settings box. Then select a few items as I’ve done here: check “Show in-meeting option to “Turn On Original Sound””, enable “High fidelity music mode”, and enable “Stereo audio”. This is where we get just a little closer to being a music platform instead of a glorified conference call.
Step 3: Test. Go to that same menu again and click “Test Speaker and Microphone” (before you do, look at the top left of your screen, and click “Turn on Original Sound” before you do). Here, you’ll be able to record and then play back a few seconds of what you’re doing. Whatever you thought the balance was, this is where you’ll know what your listeners are likely to hear.
Step 4: Set up the connection into Facebook Live or YouTube. I’m going to use the specific process for Facebook Live here as it’s the one that I use most frequently. However, the beginning steps are very similar for YouTube. Before going to the next step, ensure “Turn on Original Sound” is on. It will likely (and bewilderingly) have turned itself back off after you tested.

OK, look at the bottom right of your Zoom screen for a button labelled “More.” Click that and you’ll see an option to go Live on Facebook. Clicking that will then open Facebook on your browser.

Now Facebook will ask where you want to post your live video. You can choose your own page, a page you manage (like the one for your band), or for a group you’re a part of. Once you select and hit Next, Facebook will take you to a page where you can enter a title for the session (I’ve put “Chris Steele 2/26/21” in this one, and then a description. You can put all kinds of neat things in the description, including links back to other facebook pages or external links. You can also choose “Crosspost to More Pages” if you have more than one page you want to post to.

On that same page, check to the right to make sure that Zoom is sending over the right video and audio signals (you’ll see the video and will note audio data rate on the screen).
Step 5: Go live. Once you hit Go Live on the bottom of the Facebook menu here, you’ll enter a few seconds of limbo while the linkage is established and then you’ll be broadcasting. (Note that there is a lag of a few seconds between what you do on camera and what Facebook puts out, so you may want to be slightly mindful of what you’re doing before you hit go live – your audience will see).
And that’s it! When you’re done, terminate the broadcast by going back to Zoom and clicking “End Meeting” (which is Zoomspeak for “Goodnight Cleveland! You’ve been really great and we look forward to seeing you again real soon!”)
When it all works, it comes out reasonably well – not perfect, not like live, but reasonably well. Hope you enjoy, and please, please, please share in the comments any other tricks you’ve learned or ideas for me to try.
Thanks, and also thanks for being on this ride with me.
-Chris
(And don’t forget to sign up for the mailing list! Sign up below, and link to the February edition here)